Sometimes when I sit down to craft I don’t have a specific project in mind. It might be that I only have a short amount of time but I want to get my hands onto the supplies and play. Or I have the time but don’t have the mental energy to design something and I don’t want to use up all my time staring at my supplies and wondering where to start. Here are two solutions to this kind of situation.
The first is to work on backgrounds in my Art Journal. Since I use an old textbook for my current Art Journal, the pages need some prep before they’re ready for paint, ink and/or collage (and glue). I’ve already thinned the book down by ripping out every third or fourth page. Since I create collages, I add thickness back to the book. I also glue two or three pages together with a glue stick on either side of the spread I am starting. Finally, most of the time, I put a thin layer of gesso down.
Gesso is a primer and it adds a little body and stiffness to the page. It keeps paint and ink from soaking into the paper and at the same time it has a little texture to help paint to stick. I’m using an altered book instead of a blank artist journal because I like that starting layer of text so I like having it show, at least in some of my finished pages. So when I put gesso on the page, I’m going for a very thin layer. A credit card (or store member card) that you don’t use is great for scraping across the just-applied gesso and leaving behind just a thin film.
A heat gun speeds drying but if you only have a very thin layer of gesso, it dries pretty quickly. Once you’ve got the pages glued and gessoed, you can play around with putting some color on the page. Here is a finished page (sorry, I didn’t capture the process in pictures) that I made while recovering from oral surgery.

I worked on the background over two different days. Over the white gesso I used some poppy-red and tan acrylic paint. I scraped it back and forth over the page with an old credit card. After it dried, I put another very thin layer of gesso over it, then scrubbed some patches off with a damp paper towel, letting more of the color through in some areas. A water soluble crayon in red-orange added a bit more color.
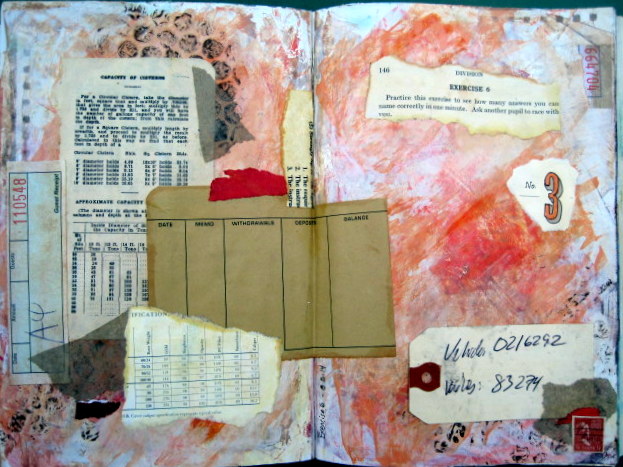
When I was working on the background, I had no idea on how I was going to complete the page. I think because my face hurt I was just putting that feeling down with my scribbles and streaks of red-orange.

After a few days I went back to the background. I decided to add some texture by painting brown paint onto bubble wrap and pressing the wrap and resulting texture onto the page. I collected a tag I’d found on the ground while out walking, a page from an old savings account book, and a few other bits of paper with numbers on them and made this collage. I think my dislike for math suited the page that started with unhappiness and discomfort after dental work!
On another background I used watercolors, gesso and white paint. This one has a much lighter, airy and yes, maybe even happier feeling to it. Again, I worked on the background and came back a few days later to add to the page. In fact, I still haven’t finished it.

I have some Light Molding Paste and decided to see what I could do with that. After posting this page, a friend wrote to ask if I’d used molding paste to create the flower. It is a pretty image from a Burt’s Bees ad in a magazine.

After her comment I purchased some molding paste and I finally took the time to play with it, using the flower in the ad as inspiration. I mixed some paint in with the paste and used a palette knife to apply it to the page.


I stenciled a little design with leftover molding paste but the two page spread is a work-in-progress. When it is finished, I’ll share it again.
So prepping pages and working on backgrounds is one way to jump into your Art Journal without having a finished project in mind. The other is this patterned paper by artist Päivi Eerola on her site Peony & Parakeet. She has a wonderful post called “How To Make Your Own Patterned Paper,” and I found the process to be very relaxing and almost meditative.
I did it in my Art Journal, so my first step was a layer of gesso to prep the pages. Brushing it on in big, quick swipes of a brush then spreading it around and scraping it off with the plastic card.

A quick swoosh with the heat tool to dry it.

Then swirls of watercolor paint.


Don’t think too hard with this, just try and be loose and easy. Swab a damp paper towel in a few spots to leave some lighter areas.

Dry with the heat tool then start doodling with colored markers with medium tips. You’ll be going back with finer points later in the process.


To be honest, at this point I wasn’t really loving the results. I was enjoying fooling around with the colors and different media and I didn’t have any other ideas at the moment, so I continued on, using the heat tool after each new layer of color and detail so they didn’t all blend into a big, muddy mess.
The next layer was supposed to be more fine doodling using gel pens but I don’t have any so I skipped that and proceeded to colored pencils, filling in color where it was more washed out then I wanted.

I don’t have a picture that shows the results of my scribbling with colored pencil – it was more subtle.
Now I used several different white pens. Two of them picked up some pigment from the page which was a cool effect, though not completely white. Then I went back with a white uni ball pen and added more details. In the directions on Peony & Parakeet, she suggests using a white correction pen. I will be experimenting with one soon!


I decided to go back with the colored markers to bump up the color in some spots.

Black and silver pens are the final detailing tools. Fine dots and little highlights add to the finished look.


I’m not sure if it is done, but I like it! I really enjoyed the process and love that it didn’t take any drawing talent or special painting skills to do this.

I might try a crazy patterned fish swimming across the page or a wild bird flying over. Or maybe this will be it.
One last thing. I recently posted a page and realized this weekend that I had an error in the quote I used. The quote was fine, except instead of writing “Everybody” I wrote “Everbody.” If anyone noticed, they were kind enough not to say anything. I don’t know how many times I looked at the page before I saw it. So…I fixed it.

Wishing everybody beauty and time to create it in your life. Thanks for your visit.