Tag Archives: summer

Recipe: Thai-Style Seven Flavor Salad

IMG_0164

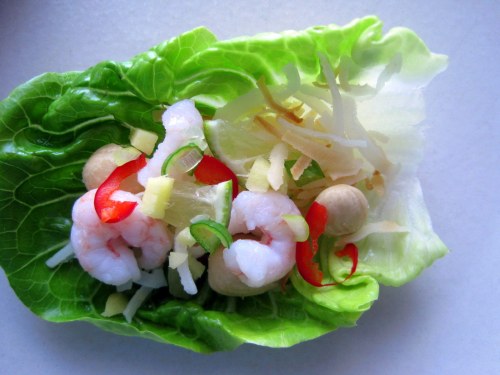
After nearly two weeks of juicing fruits and vegetables for breakfast and lunch and eating vegetarian meals for dinner, Rem and I went our for Thai food on Friday evening and ate a yummy appetizer that inspired this dish. At Thai Smile in San Rafael, the dish is called MIANG KHAM (Spinach Wraps).

Instead of a bowl or plate of salad this is assembled in small lettuce leaves and eaten out of the hand like a mini lettuce taco. Each person assembles a wrap with the seven different ingredients, plus the chutney to pull it all together. It is very flavorful.

I used lettuce leaves instead of spinach and cooked shrimp meat instead of dried shrimp. Peanuts were replaced with almonds, but only because I didn’t want to buy a large bag of peanuts.  Either would be great. It was a refreshing supper on a hot summer evening.

IMG_0157

I also cheated by using chutney for the sauce, but it was fairly similar to the sweet, gingery sauce we enjoyed the other night.

I’m going to offer suggested amounts for two servings, but to be completely honest, I didn’t measure as I was making this. So feel free to ad-lib and adjust as you see fit.

Thai-Style Seven Flavor Salad

2 baby gem lettuce, leaves pulled apart and washed and dried on paper towel or in lettuce spinner

1/3 lb. cooked shrimp meat

about 1 cup dried shredded coconut, toasted in a dry pan until a bit brown, watching carefully so it doesn’t burn ( I got plain, unsweetened shredded, dried coconut at Trader Joe’s)

1/2 cup roasted, salted peanuts or almonds (I used rosemary and salt Marcona almonds – yum!)

1/2 lime with peel, thinly sliced, each slice cut into about 6 small squares

1 inch piece of fresh ginger, peeled and cut into very small dice

2 inch piece of green onion, finely sliced or chopped

1/2 jalapeno chili cut into very thin slices, than cut those in half or quarters

1/2 to 3/4 cup of chutney

Arrange all ingredients in small bowls or in piles on a platter.  Each person assembles their own individual wraps.

IMG_0167

The coconut and almonds or peanuts are crunchy, the chili, onion and ginger add their own zing and the lime is bright and tart. The dried shrimp we had in the restaurant was kind of chewy and salty.  But for our summer dinner (with half an avocado on the side), the cool, sweet shrimp were delicious.

IMG_0168

In my #30DayJournal project today, the prompts asked about how I bring creativity into my life, and experimenting with recipes is one of the ways I do that.

IMG_0166

Thank you for stopping by (sorry for the early draft that went out by mistake to my subscribers).

4 Comments

Filed under Cooking

Ratatouille in a Slow Cooker

Ratatouille Ingredients

I need to share this recipe with you.  I’ve made a batch every week for the last three weeks and think it’s delicious but I can’t seem to get any good pictures of the finished dish.  But I can’t hold out any longer.

This came about because I bought some vegetables that I planned to cook on the grill. But it was so hot that weekend, I didn’t want to cook at all.  The next weekend rolled around and I still had the vegetables, a little worse for wear.  It was still hot so I wanted a recipe for the slow cooker.  I wasn’t sure how it would turn out but it was great!

My recipe is adapted from one I found by Geema at Food.com.  Each time I make it, I change it a bit based on what I have in the fridge.  It is pretty flexible, so if you don’t like mushrooms, by all means, leave them out.  If you have some fresh herbs to use up, put them in.

Third Batch Ratatouille ingredients

The first time I made it I didn’t take any pictures.  The top photo is from my second batch and I used 4 squash, Japanese eggplant and only one bell pepper.  The third time I made it with regular eggplant, big zucchini and bell peppers and small tomatoes.  It was delicious every time.

Here’s the recipe but don’t be too worried about measuring everything exactly.  Sprinkle in the herbs, drizzle in the oil and enjoy the way the dish melds into something greater than the individual ingredients.

Ratatouille in a Slow Cooker

Adapted from Geema at Food.com

1 large eggplant or 2 Japanese eggplant, (about 1.5 lbs. total), cut in cubes

eggplant

3 or 4 zucchini or other summer squash, cut in chunks

Zucchini

2 onions, cut into quarters and sliced

2 red bell pepper, de-seeded and cut into strips or squares

8 oz. mushrooms, cut in quarters  or if really large into 6ths or 8ths

2 large tomatoes, cut in wedges than chunks

2 cloves garlic, minced

'shrooms, onions, bell pepper and garlic

1 (6 oz.) can tomato paste

1 teaspoon dried basil

1/2 teaspoon dried oregano

1 teaspoon salt

1/2 teaspoon black pepper

3 to 4 tablespoons olive oil

Optional:

1 teaspoon sugar (I used it twice and forgot it the third time and the difference was pretty minor)

pinch hot pepper flakes (use caution here, a little goes a long way)

Hot Pepper Flakes

Directions:

Put half the vegetables in the slow cooker.

Dot half the tomato paste over the vegetables and sprinkle half the seasonings on the vegetables.

Drizzle with half the olive oil.

Half of the recipe in slow cooker

Repeat with remaining vegetables, tomato paste, seasonings and olive oil.

Cover, set slow cooker to high and cook 3 to 6 hours or low for 7 to 9 hours.

Full Recipe in pot

I used some fresh herbs in this batch.

Covered and Cooking

The last time I made it, my zucchini and bell peppers were on the large side.  It was a very full pot and took longer to cook. Next time I’ll use smaller veggies.

The finished stew.

Ratatouille

This is good hot with some grated Parmesan.  It is also good cold on a hot day.  You can toss it with pasta or use it for a pizza topping or sandwich filling.

How about on an open-faced meatball sandwich with melted cheese over the top?

Meatball sandwich

Or add some beans to boost the protein. I like a piece of french bread (or two) on the side to sop up the juice.  I imagine you could use a stick blender to make a smoother sauce.  I like it chunky so I haven’t tried that yet.

With Beans

Thank you for stopping by.


6 Comments

Filed under Crafts

Can He Bake a Cherry Pie?

Cherry Pie with Struesel Topping

This is a guest post by Rem O’Donnelley, my sweetheart and partner of 15 years.  We’re a great team and the other day we made pie together.  I asked him if he would write a post about it and this is what he wrote:

Who doesn’t like a good cherry pie? I didn’t see any hands raised in internet land.

I had a box of pie dough sitting in the fridge. Originally, it had two pie crusts but I used one for a pumpkin pie. I was about to do the same thing when Dianne suggested making a cherry pie. She heard on the radio that there was a one-day sale at Whole Foods so I bought a two pound bag of cherries.

Since there was only one crust that meant that there was no crust for the top. Dianne had the idea of a streusel topping. I found an oatmeal streusel recipe here which we adapted.

Cherries on hand and we began to work. I washed and stemmed the little red gems.

Cherries in Colander

Dianne pitted them.

Pitting Cherries

That done, next the cherries were put in a large bowl with sugar, tapioca granules and vanilla. We decided to stick with just cherries and omitted crystallized ginger and almond extract from the original recipe.

It didn’t look like it was enough cherries so we added the other half pound to the mix. (Note: adaptions have been included in recipe here)

Measure Cherries
Once this was mixed, I spread out the pie crust in a glass pie dish. Then the cherry mixture was poured in.
Finally came the topping.  Again, we made some changes to the recipe. It didn’t seem to have enough butter and sugar to balance the oats and flour, so we increased the amounts a bit.

Making Streusel
I mixed it with my hands until it was crumbly and then sprinkled it on the cherries.  Then it went in the oven.

Here is the recipe.

Cherry Pie with Oatmeal Streusel Topping

Adapted from Miri Rotkovitz at About.com

Baking time – 40 to 45 minutes

Yield: 1 9-inch pie

Ingredients:

1 9-inch unbaked pie shell, homemade or store-bought, thawed if frozen.  We used Pillsbury refrigerated pie dough

2 lbs. cherries, pitted (5 to 6 cups) If desired, cut cherries in half. This recipe called for “1 lb., (about 4 cups)” but we found it was more like 3 cups. Our pie had about 5 cups of cherries and it could have held 6 cups, no problem.

3/4 cup granulated sugar

3 tablespoons granulated (instant) tapioca or tapioca starch

1 teaspoon pure vanilla extract

Pinch of salt

Butter and Cinnamon

For the Streusel Topping:

3/4 cup rolled oats

1/2 cup all-purpose flour

1/2 cup sugar

1/2 teaspoon cinnamon

5 tablespoons cold butter, cut into small pieces

Directions:

Preheat the oven to 400° F.

In a large bowl, toss together the cherries, sugar, tapioca, vanilla extract, and salt. Mix just until the cherries are evenly coated with the other ingredients.

Sugary Cherries

Pour the cherry mixture into the pie crust.

Wipe out the bowl (or use another, smaller one) and mix together the oats, flour, sugar, and cinnamon. Rub the butter pieces into the dry ingredients with your fingers,until the butter is well incorporated and the mixture is crumbly. Sprinkle the streusel mixture evenly over the top of the pie.

Place the pie on a parchment-lined baking sheet to catch drips. Bake in the preheated oven for 40 to 45 minutes, or until the crust and streusel are golden and the filling is bubbly. Cool the pie in its baking dish on a rack.

Just out of the oven!

Serve slightly warm or at room temperature. Store leftover pie, well covered, in the refrigerator for 2 to 3 days.

Pie and Ice Cream

(Editors note: Rem made the vanilla ice cream too!)

It turned out great. The only thing I would change is cutting the cherries in half so the cherries are in smaller bites.

Thumbs up!

Thumbs Up Selfie

Thanks, Rem, for writing a post about our pie-baking and for the great selfie.

Thank you for stopping by.


8 Comments

Filed under Cooking

Corn Dog Mini Muffins

Cut Open Mini Muffin

Have you seen these on Pinterest?  I’ve been wanting to try them but it wasn’t until I bought two mini muffin pans that I found in the housewares section of T.J. Maxx that I made them.  They are simple to make and if you like corn dogs, I think you will enjoy these.

I don’t eat hot dogs very often but every once in awhile I crave a corn dog.  Here I am with a giant corn dog at a street fair a few years ago.

Big Bite of Giant Corn Dog

This monster was probably the biggest corn dog I’d every had.  It was ginormous!

Dipping the Dog

It was coated in a thick layer of cornmeal batter and deep fried to a deep, crispy brown.

Vat of Frying Corn Doggies

It was delicious, but not exactly a guilt-free treat.

So the idea of a miniature corn muffin with a bite of hot dog in the middle was very appealing to me.  Baked, not fried and small enough to have a few and still be ahead of the game (or at least as compared to eating one of those fried street fair corn dogs).

Corn Dog Muffin Ingredients

Corn Dog Mini Muffins

Yield: 21 to 24 mini muffins

Ingredients:

1 8.5 oz box of corn muffin mix (makes 6 to 8 average-sized muffins)

1 egg

1/3 cup milk

3 or 4 jumbo hot dogs  (I used Hebrew National beef franks)

nonstick spray

mustard (to serve – optional)

Directions:

Combine muffin mix with egg and milk as directed on package of muffin mix.

Muffin mix with egg and milk

Side note: Did you know that the President of Chelsea Milling Company, makers of Jiffy Baking mix, is named Howdy Holmes?

Howdy Holmes

I didn’t either.

Anyway, back to the recipe.  Stir just until dry mix is moistened.  There should be some small lumps.

Lumpy Muffin Mix

Spray the muffin pans with nonstick spray.  I used a paper towel to kind of spread it around in each cup.

With two spoons, drop about a rounded tablespoon of muffin batter into each muffin cup.  I made 21 muffins but could probably been a little more careful spooning it out and stretched it a bit.

Spooning Batter

Next cut a hot dog into pieces.  I tried cutting the first one into 6 pieces, not quite an inch each.  The hotdog was about 5.5 inches long.

6 pieces of hot dog

I wanted a high ratio of hot dog to corn muffin. But after baking the first pan, I realized I could make the pieces a little smaller and still achieve the results I wanted.

9 piece hot dog

I cut the next one into 9 pieces.  I think I could have cut each hot dog into 7 pieces to make it all even for 21 muffins, but if you stretch your batter to 24 muffins, you’ll want to cut each hot dog into 8 pieces.  Or use all four hot dogs in the package and cut each one into 6 pieces. Got that?

I experimented with the placement of the hot dog pieces in the batter.

Muffins Different Ways

Next time I make them, I’ll  scoop out a little dollop of batter, put the slice of hot dog in and only partially cover it with batter.  I liked how the ones with a little hot dog peeking out of the baked muffin looked.

Bake in a 350 degree oven for 12 to 15 minutes.  Serve warm.

Baked Baby Corn Dogs

Here are some that I baked with the pieces of hot dog turned on the side rather than with the cut side up.

Each muffin is about two bites and they are really tasty with a  bit of mustard.  One small warning: the second bite of the mini muffin is a little precarious as the tender cornmeal crust tends to crumble as you bite into the more resilient hot dog.

I took some for lunch to work on Friday and they warmed up very nicely in the microwave.  A toaster oven would probably be even better.

The best part is they completely satisfy my corn dog craving!

Wiener Dumpling

Rem calls them Wiener Dumplings.

Thank you for visiting.


5 Comments

Filed under Cooking

End-of-Summer Supper

Rice-Stuffed Tomato

I know that the end of summer doesn’t come on the calendar until later in September.  But when school starts, and the days start getting shorter, that’s pretty much it for me.

Earlier in the week I fixed dinner for my mom, my boyfriend and I to enjoy at her house.  It was a little celebration of the end of summer with some of the produce that is so wonderful this time of year.  For me, corn and tomatoes top my list of what-tastes-like-summer, with stone fruit right behind.

I went to the Farmer’s Market on Sunday, got the fixin’s, and this was my menu:

White Corn on the Cob

Rice-Stuffed Tomatoes (from Smitten Kitchen)

Sweet Italian Sausage

Rosemary Focaccia

Almond-Crisped Nectarines (from Smitten Kitchen’s recipe for Almond-Crisped Peaches)

Unfortunately, due to my lack of skill and some poor lighting, I didn’t get all the pictures I would have liked to share with you.  Get on over to Smitten Kitchen – she’s got some beautiful pictures as well as the recipes for the Rice-Stuffed Tomatoes and Almond-Crisped Peaches – or nectarines.  As for the corn, sausage and focaccia – use your imagination!

I do have some shots of the Rice-Stuffed Tomatoes, and a little further down, some pictures of the nectarines.

Start with good tomatoes, cut off the tops and scoop out the insides.

Hollowed Out Tomatoes

Take all that nice juice and pulp…

Tomato Pulp & Juice

and puree it.

Pureed Tomato Pulp

You also need onion, garlic, olive oil, arborio rice, bread crumbs, salt, and some fresh herbs.  I had rosemary, so used that…basil would be delicious.

Ingredients for Rice-Stuffed Tomatoes

Arborio rice is short-grained, starchy rice, used for making risotto.

Arborio Rice

After cooking the onion and garlic in some olive oil, add the arborio rice and cook it a bit before adding the tomato puree.

Cooking rice & tomato puree

Simmer that on medium-low heat until the rice is partially cooked, stir in salt and herbs.

Par Cooked Rice

Now take the creamy-tomato-y rice and stuff it into the hollowed out tomatoes. Top with bread crumbs and a drizzle of olive oil.

Stuffed, ready to bake

Bake for 30 minutes.  While the tomatoes bake, fix the rest of your supper (it doesn’t have to be corn on the cob and sausage).  How about a little butter lettuce salad?  The tomatoes are simple, seasonal, and delicious hot or cold.

Yellow Rice-Stuffed Tomato

I did the tomatoes the day before but you could have them in the oven at the same time as the Almond-Crisped Peaches.

One suggestion (that didn’t occur to me) is to find free-stone peaches or nectarines.  It was a little tricky cutting the pits out of the ones I bought, but they were still delicious.  The filling is a combination of almonds (I used almond meal), butter and sugar.

Filling in Nectarines

Spread the filling out to cover the cut fruit-halves.

Almond Topping

Now bake.  Mmmm. It smells so delicious while it’s cooking.

Serve warm with ice cream.

With Ice Cream

I hope you enjoy the Labor Day weekend and the last fruits of the season.

Thanks for stopping by.

Leave a comment

Filed under Cooking

One Pot Farro with Tomatoes

Farro and Tomatoes

Something that I like to do on Sunday is fix an easy supper that makes enough to have leftovers for a lunch or two during the week.  Actually, I’m a big fan of getting a second dinner out of leftovers too.  This dish is pretty simple to put together, it is cooked in one pot and includes delicious little tomatoes, one of the joys of summer.  It is from Smitten Kitchen, which in turn was adapted from a version in Martha Stewart using pasta instead of farro.

Bowl of Farro & Tomatoes

It is one of those creations that seem to be greater than the sum of its parts. I picked up grape tomatoes at the Farmer’s Market but this time of year you can find colorful, sweet cherry or grape tomatoes at Trader Joe’s and Safeway too. The Smitten Kitchen recipe calls for ½ of a large onion and I used a whole medium-large one and it cooks down in the finished dish, which was so sweet, mellow, and tomato-y that I am ready to make it again.  Basil and grated Parmesan cheese are the finishing touches.  Without the cheese, you might want to increase the salt a bit.

Farro Ingredients

Farro with Tomatoes

Adapted from Smitten Kitchen

Serves: 2 as a main dish, 4 as a side (or dinner and a lunch or two)

2 cups water

1 cup semi-pearled farro (sometimes labeled whole farro) or Trader Joe’s 10 minute Farro (I’ve only done it using the 10-minute Farro)

1 onion (I used a yellow onion)

2 cloves garlic

9 ounces grape or cherry tomatoes

1 1/4 teaspoons kosher or coarse sea salt

1 tablespoon olive oil, plus extra for drizzling

To serve:

Grated Parmesan

Few basil leaves, cut into thin ribbons

Grated Parmesan cheese

Directions:

Put water and farro in a medium saucepan to presoak while you prepare the other ingredients. Five or ten minutes is enough time.  If you are using the 10-Minute Farro, you can omit the presoaking.

Cut onion in quarters and thinly slice.  Add to the pot

Thinly slice garlic and add to the pot.

Halve or quarter tomatoes and add to the pot.

Add salt and 1 tablespoon olive oil to pot.

Ingredients in Pot

Bring uncovered pot to a boil, and then reduce to a gentle simmer, stirring occasionally. Cook for 30 minutes.

Farro Simmering

Farro should be tender but with a little chewiness, and the cooking water will be completely or almost completely absorbed. If needed, cook for 5 more minutes.

Closer to Done

You can double the recipe.

In the comments on the Smitten Kitchen site, several people suggested adding some canned white beans near the end of the cooking time, which is a great idea.  I had this with leftover grilled chicken and a green salad.  Delish.  I thought it was also great cold for lunch.

Closer View

As always, thanks for the visit.  Please do comment as it makes me so happy!  If you try the recipe, I’d love to hear about it.

6 Comments

Filed under Cooking

Day 22: Shine On

Shine On!

Day 22: Shine On. This happy salute to summer is my take on this poster I saw on Pinterest.

When I started, I decided the blue “sky” background was brighter than I wanted.  I wish I’d had light blue and aqua tissue paper.  But it looked kind of cool with the empty circle in the middle.

Background Sky

I added white tissue paper to tone soften the blues.  Than I added the sun in the middle.

Then I forgot to take any more pictures of the process.  So this is the finished project.

Shine on Sun

Searching for words I wanted to use took some time.  Other words I put together with a great sticker set that I received from my friend, Lisa (thanks, Lis!)  It’s perfect for this.

Closer Sun

Yes, chocolate IS like a ray of sunshine in my life.

Chocolate

Last year my Day 22 project was Water Marbled Nails.

I did Fabric Covered Notebooks the year before that.

Thank you for stopping by.

4 Comments

Filed under 30DOC, Crafts

Day 21: Spa

Spa

Day 21: Spa.  I went to Imperial Day Spa in San Francisco today, this first day of Summer. It was wonderful.

As I wrote on the fingers on the right side of the page: “Beautiful women’s bodies, yes, mine too, being tended: soaked, scrubbed, sluiced with water, massaged with oil.  My skin is so soft now.”

I didn’t feel like a goddess even though I brought an ambrosial snack for myself: apricots and dates.  But it was a lovely experience.

Hand

This Korean spa is different than some spas I’ve been to.  It is communal (separated by sex) and really no one cares that you are naked.  They are too.  It is not hushed though it is relatively quiet.  The staff chatted quietly some  of the time.  It was clean and relaxing.

This was my third visit.  I think it was the most vigorous scrubbing I’ve ever experienced.  It felt like a renewal to me – shedding my old skin, but it is not for the shy or sensitive.

water skin heat

The room where the scrub and massage was given had 4 or 5 other tables and 3 other clients being treated at the same that time I was.  Basins of hot water were sluiced over me as I lay on a plastic covered padded table. At various times towels (both dry and hot/wet) were draped over me, including a small one over  my eyes.

soothing pool

After the rigorous scrub-down I had a massage.  My attendant was strong as she manipulated my limbs and rubbed me with oil.  She used her fingers, thumbs, knuckles and elbows.  A fresh-grated cucumber mask, all cool and soothing, was patted onto my face and I lay in a semi-zoned-out state, becoming more limp as the treatment continued.

Hot milk was splashed all over me before a final, drenching rinse.  She helped me off the table, toweled me dry, got me into my spa-provided robe and sandals (she even tied the belt).  I took my tender, new, baby skin back to the locker room and after drying my hair and dressing I headed to Japantown.

Do I looked fully steamed, kneaded and renewed? This is in the locker room, right after the treatment. I think I look a little crazed, but maybe I was just zoned out.  (I would have been very happy to crawl into bed and take a nap at that point).

Self-Portrait in Locker Room

Scenes from Japantown Center: Peace Plaza.

Peace Plaza

Umbrella mural.

Umbrella ella ella a a a

Origami crane.

Crane

Beckoning cats.

Lucky Cats

California Roll for lunch.

sushi

Paper lantern.

Lantern

On Day 21 last year I did a Bleach Pen T-Shirt.

The previous year my Day 21 project was Cards with Charm.

Happy Summer to you, and thank you for the visit.

6 Comments

Filed under 30DOC, Crafts

Pesto

I love pesto.  I’ve had a few simple variations and I love those too.  Basil + garlic + nuts + cheese + oil is such a winner that I haven’t strayed very far from the classic, but I would probably also be very happy with other versions.

Lucky for me I was walking with my mom a few weeks ago and just when we were going back up the driveway her neighbor said she was cutting back her basil plants.  “Would you like some?”, she asked us.  Before mom had a chance to speak I was through the garden gate.

An armload of aromatic basil and a few heads of garlic later and I knew a batch of pesto was in the making. I’ve since polished off that first batch and made a second one today because I enjoyed the first so much.

Pesto is classically made with fresh basil, pine nuts, Parmesan or Romano cheese, garlic, olive oil and salt.  Some people like and use more garlic.  I didn’t have enough pine nuts so added some toasted, slivered almonds to this batch.  I’ve seen it with lots of oil and less of everything else, but I prefer a thick pesto with lots of texture and lots of all the goodies that make it so delicious. A colleague mentioned a recipe her brother had made with plenty of heavy cream.  Sounds lovely and very decadent.  Here is my recipe.

Pesto

Ingredients:

1/2 cup pine nuts – (you can substitute almonds, walnuts or other nuts for all or part of the pine nuts)

1 to 2 cloves garlic – one good sized clove is plenty for my taste buds

2 to 3 packed cups basil leaves – basil in the store and farmer’s market comes in all different size bunches and to make a batch of pesto you will probably need 2 or 3 bunches.  My first batch probably had 4 cups of leaves.

1/2 cup grated Parmesan cheese

3/4 cup olive oil

salt to taste (the saltiness of the cheese and your own personal preference will determine how much salt you add – taste first and add less than you think to start – you can always add more later but it is difficult to fix if you put in too much in the beginning)* see note further down

Directions:

I don’t always take the time to toast the nuts but it does add a nice layer of flavor.  The last batch I made was with already toasted almonds.  Toast nuts in a dry pan on medium heat, watching carefully and stirring often to keep from scorching.  They go quickly from not quite toasted to burnt, so keep a careful watch.

Put nuts and peeled garlic in the bowl of a food processor fitted with the chopping blade and process until the nuts and garlic are finely chopped.

Add basil and pulse until the leaves are finely chopped and mixed with the nuts and garlic.

Add cheese and pulse to combine.

With processor running, add oil in a steady stream, stopping to scrape down sides of processor bowl a few times as needed.

Taste and if desired add salt and pulse to combine.

Note about salt: I made a batch of pesto recently and put salt in with the nuts in the beginning.  Not a great idea.  The particular brand of Parmesan cheese I had was very salty and when I took a taste of the finished pesto it was extremely salty!  I didn’t have any more basil but I did have some fresh parsley in the fridge, and more nuts in the cupboard.  I added parsley to the food processor along with another quarter cup of nuts and the results were really wonderful.  It was still on the salty side but it is a sauce that I use often but with a light hand.  This “rescued” batch was really good and was still bursting with flavor.  I couldn’t detect the parsley and I didn’t have to throw out the yummy sauce I’d made.

(I wish you could smell this stuff – it is so fragrant and so delicious!)
 

The resulting Pesto Sauce should be pureed but with some texture to it.  I understand it freezes well but can’t advise you on that as I just scrape it into a jar and keep it in the fridge, stirring it into pasta, topping pasta and pizza with it and dressing salads and other vegetables with pesto alone, stirred into mayo or hummus or shaking it in a jar with lemon juice and olive oil.

One of summers prodigious growers is zucchini.  I sliced several slender squash from the Farmer’s Market thin using a mandoline slicer from Benriner, than sauteed them and topped the resulting ribbons with fresh pesto.  Delicious.

Thank you for coming by.  Thanks for the ongoing interest and support – this is my 200th blog post!

6 Comments

Filed under Cooking

Sea Ranch in the Summer

It’s been over a year since my last trip to Sea Ranch.  My mom and I went up to the vacation home neither of us had been back to since my dad had been diagnosed with cancer last May.  It was an emotional trip but also comforting to be in this soothing, familiar place that is another home.  Mom wanted to return for her first time up there without Dad but she didn’t want to go alone.  My sister would be arriving a day after my mom  and I suggested I go along, following in my own car.  We would provide company for each other and I could help with Molly who, though she loves being at Sea Ranch, hates the ride up the twisty parts of Route 1.

We went through fog in Bodega Bay.   I usually visit in the early spring when the hills are green and dotted with cows, sheep and lambs and wild iris and other wild flowers are coming into bloom.  As we neared Sea Ranch, the fog cleared to a warm, sunny afternoon.  The summer landscape is tawny with golden-yellow meadows of dry grasses. Once we get to the house, we take a walk down the path to the bluff and beach.  On closer look I started to notice the different colors.

Soft purple flowers grow almost hidden in the edges of the meadow, lower than the surrounding grass.

These large, lacy clusters remind me of cauliflower but prettier with white and pale purple blossoms.

A wild rose is a spot of pink.

Thistle bloom in a rich magenta.

Unripe blackberries are an eye-catching red.

Deep-orange nasturtium grow up a fence.

A cluster of yellow flowers have a toe-hold in the rocky face of the bluffs.

A large group of harbor seals are resting on a beach. If you look carefully (or click on the photo for a closer look) , you can see a pelican is hanging out with them. This link has some great close-up shots of harbor seals at Sea Ranch.

It’s lovely being by the ocean and breathing in the salt air.

In our walks that afternoon and the following morning we saw several driftwood structures.

Playhouses for kids enjoying the Fourth of July holiday.

Or architectural artwork created by adults.

Seaweed marked the tide line.

Walk On Beach was wide and welcoming.

Molly found a rope of kelp to chew on.

Mom and Molly – a poignant reminder of my dad walking on the beach with Molly.

I love the variety of beautiful if subtle textures and colors the beach offers.

Although the sun is out and we’ve shed our sweatshirts, neither of us is interested in a dip in the ocean but this woman and her dog seemed to be enjoying themselves.

We climb the three flights of stairs from the beach to the bluff trail and head back to the house.  We catch our breath and look back at the beautiful beach and ocean.

A flock of pelicans is going the other direction.

Back at the house, Mom gave Molly a quick rinse and towel dry to get off the sand and salt water.

That afternoon I was back on the road, heading south and home.  I varied the route slightly by going up Meyers Grade – when I pulled off to take this picture of the fog coming off the ocean.  I’m looking down the coast towards the mouth of the Russian River  and Bodega Bay.

Across the road I saw my first ever Pirate Cow. Aaarrr! Moo.

One last shot of the road twisting down the hillside back to Highway One and then I turned my attention to my drive home after a short but satisfying visit to Sea Ranch.

Thanks for coming along.

7 Comments

Filed under Life