Monthly Archives: February 2015

Zipline Anniversary Adventure

IMG_0056

Rem and I donned harnesses and helmets for another high-adventure experience. We started vacation on Friday, February 27, our 16th anniversary.  We decided to celebrate with a few hours ziplining up in the redwoods.

I’m not particularly fond of heights but I thought I could manage this and also have fun.  It was fun, exciting and scary for me and Rem agreed it was fun and exciting but he wasn’t scared.  There were frightening moments leaving the platforms for each zip, but the part that made my knees wobbly was standing on the small platforms, high in the treetops of often-swaying trees.

IMG_0046

Here’s Rem getting geared up. Helmets and gloves, plus a leather “brake” for the right hand that goes over the glove, complete the ensemble. We were at Sonoma Canopy Tours near Occidental which is part of Alliance Redwoods Conference Grounds. Though it is a Christian facility, you wouldn’t have known that from our experience.

DSCN4039

Each tour group has 8 guests and two guides.  Alina clipped us safely to the line and started us on each zip, and Joey received us on the platform at the end of each run.  Both provided training, safety information and guidance along the way and both used humor, encouragement and a balance of what TO do and what NOT to do. They also told us about the trees and plants we were moving through and reminded us to enjoy the beautiful views.

IMG_0054

Our group included a young couple who work at a ski lift in Mammoth and four women, part of a group of eight members of the board of directors of a nonprofit (the others followed in the next tour 20 minutes later) doing team building together.

The first training is done between two trees at the base of the hill.  Joey demonstrated his simple hand signals for slow down  or start braking – move your braking hand off the trolley (the metal part that slides along the cable) and put it flat on the cable behind the trolley and above your head, and for stop braking, so you didn’t lose too much momentum and stop before you got to the platform.  Parking brake means to grab the cable with each hand so when you do stop, you don’t start sliding backwards.

One by one we each stepped up on a small wooden step  (it looks kind of like a miniature picnic table) and Alina hooked the trolley, which was attached with straps to our harness, onto the cable, then clipped our lines to the trolley, directed us to put first the left than right hands on top of the trolley, and sit down in the harness.  She taught us how to straighten out if we started to turn (“steer with your wrists”) and if we did have to pull ourselves in, how to do that.  We each experienced turning, braking, parking brake and pulling ourselves back as well as a short zip down the training line which was just a few feet off the the ground.

We loaded up onto benches in the back of a pickup and rode way up the hill to the first platform for our junior zip (or “bunny hill” as Joey described it). This platform has railings and because it is on a hill, you just step out onto it.  So far, so good. We get clipped onto a line circling the tree (as we did at each platform along the course) and our guides tell and demonstrate the procedure again.  One by one, we each take our first zip – that’s Rem leaving the first platform and heading to the second.

IMG_0050

Looking out to the second platform, it looked kind of far away!  Even this junior zip felt quite fast and high up from the ground.

DSCN4042

Rem was breezily looking down over the edge and completely at ease on each platform (none of the rest had railings) while I would cling to the rope overhead that our lines were clipped to around each tree. I didn’t mind if other people were near the edge but every time Rem would crouch or lean to take a photo, I felt a little woozy and weak-in-the-knees.  My arms and shoulders were sore and tired last night and I realize that at least in part, that was because I was hanging on for dear life!

DSCN4069

Looking down from the second platform. It is about 80 feet up and the distance is longer from platform 2 to platform 3.  The ride is faster too.  Platform 3-4 goes over a 300-foot ravine and is about 300 feet long (as I recall).  It’s 500 feet to the next one.  The order of who went first for each zip changed.  I went first once – from platform 2 to platform 3.

I kicked the small landing step three times as I arrived, not slowing down quite as efficiently as I should have. Rem had to pull himself in once, as did some of the other lighter-weight guests or those who nervously braked too soon. Not an issue with me.  I watched Joey and only slowed when he indicated to.  One of the women in the non-profit group was quite anxious and did one tandem run (she was small and for this zip could have been stuck part way out on the line), but she made it the whole way through the course with all of us cheering her along.

Here is Rem departing on a zip. That platform looks really far away!  When Alina would ask if I was ready I’d think “if I waited until I was ready, I would be here for hours” and just take a deep breath and go.

IMG_0059

IMG_0060

The next, and longest zip is 800 feet long. You can’t even see the next platform!  This is Rem coming towards the platform that I’m on.

IMG_0062

Getting a little closer…

IMG_0063

IMG_0064

There are cameras mounted in one area, so we could buy a picture (Rem didn’t want his) taken on a fairly short zip.  I got brave enough to actually lift my hand and wave!

Sonoma1_47246

Of course when we had a chance to look at Rem’s pictures, he’d caught almost the same thing:

DSCN4082

The next section from platform 7 to 8 was a spiral staircase climbing 30 feet up.  Joey went up with the first four people and Alina took the our group.  She’s the one with the yellow helmet.

Sonoma2_22949

Sonoma2_22949-001

From there we crossed a 175′ long sky bridge, feeling every sway and swing as we walked.  I didn’t much like crossing this and the next bridge.  We were over a ravine.  I didn’t look down.

DSCN4096

You’re still attached the the line but the undulations of the bridge and the uphill climb at the end were a bit stomach-dropping.

DSCN4110

DSCN4113

Our guides described the new Extreme course they are building with much longer runs, higher elevations and sky bridges that will be without railings and will have gaps in the planking.  No. Thank you, but no.  I’m so not interested!  Night time ziplining will also open with lights in the trees along the way.  I think not.

DSCN4114

Others were walking without holding on to the railings.  Rem was blithely taking pictures but I was holding tight to the cable. Well, I did pose once when our guide offered to take a picture of the two of us.

IMG_0068

The perspective is a little tricky in this picture – believe me, the ground looks much closer in the picture than it was in reality.

DSCN4117

This is just before the last zip.  From there, we had one more adventure to experience.

DSCN4126

From the final platform we rappelled 80 feet down to the forest floor.  Hanging on to the rope and stepping off the platform was looking like no fun at all.  You have to go to the edge of the platform and do this little maneuver so you end up with both feet on the edge, facing inwards.  Luckily, Alina had a nice trick that involved crossing my feet and swiveling around and I managed it without too much embarrassment. Once you’re off the platform it’s fine and I was glad to be back on the ground.

Here is Rem coming down.

IMG_0072

We celebrated our successful completion of the zipline course with a feast at Negri’s.

IMG_0075

You can have the whole dinner or just an entree and we decided to do the whole enchilada, so to speak.  Or maybe that should be the whole plate of ravioli.  With Rem’s fried prawns and my chicken Marsala we got minestrone, French bread, salami, green salad, bean salad, pickled vegetables, delicious homemade ravioli and then the entree! I had veggies on the side and Rem had french fries.

The door handles are giant utensils – appropriate for the generous meal.  We didn’t finish it all and will have leftover minestrone for a lunch or dinner at Sea Ranch.

IMG_0090

IMG_0092

Ziplining wasn’t as scary (or uncomfortable) as skydiving.  It wasn’t the huge adrenalin rush either, but for me, it was more fun.  I’m glad I did both.  Here is a necklace I got after skydiving and had in my bag yesterday.

IMG_0095

Thanks for the visit! I’d love to read your comments.


6 Comments

Filed under Crafts

One Final Round of Valentine’s Cards (Including A Collage Workshop)

IMG_0082-001

My favorite craft shop in Marin, Once Around, offered a Vintage Valentine collage workshop with collage artist and author, Anna Corba.

We each got a sweet little packet in a stitched paper bag she’d made from old French newspaper that had several cards and envelopes, a piece of heavy watercolor paper and a postcard made of wood tucked inside to serve as the bases for our creations. She had several boxes of vintage-style images, mostly color copies of beautiful paper ephemera from her bountiful collection, and we could sift through to find just the right images, patterns and colors for each card we made.

IMG_0088-001

Anna showed us samples of her own work and talked about how she likes to work – letting each unique image speak to her, and working with a color palette based on the images she chooses.  We trimmed and tore the different pieces of paper and then starting moving the elements around like the pieces of a puzzle until we found a pleasing composition.  Anna walked around the table making suggestions and helping when someone was stuck.

She pointed out that a piece of darker paper along the bottom of the composition can be helpful to ground it, and it is nice to tuck a little surprise inside a card that coordinates with the design on the front. We also decorated envelopes, or in some cases, small paper bags, to make a matching set.

IMG_0084-002

During the last part of the workshop we were able to seal two of the collage designs (the thicker flat cards) with beeswax.  This was just lovely, though I wish we’d had more time to spend on it. First of all the scent of the warm wax is divine, and reminded me of a tiny chapel in Italy that had a huge arrangement of white lilies and was completely lit with beeswax candles . Brushed across the collage it added a dull sheen and faint golden color, saturating the paper and allowing some layers to show through others.

IMG_0090-002

In this card you can see the sheet music behind the other paper.  I wasn’t really able to capture the beauty of this technique in my pictures.

The downside is, you don’t always want a background paper to show through and by the time I learned that, I’d already created this card.  I wish I’d trimmed the wide striped paper so it wasn’t behind the puppy and kitten images.

IMG_0027

Anna had stitched this little sleeve using red thread and then cut a wide scalloped edge for the wooden postcard. After the class I was able to finish all the envelopes with paper brought home from the class and a few extra embellishments from my own stash. My style is busier and messier than Anna’s but I really appreciated and enjoyed the techniques she showed us in the workshop.

I don’t tend to use glue sticks but they are more forgiving then the tape rollers I favor.  Anna reminded me of a technique I’ve seen before but forget about: use a magazine you’re done with as your surface to glue on, keeping your work surface clean. As soon as a page is sticky, turn to a clean page. Once you’ve got your design pretty much set, maybe about 75% in place, she starts gluing the images down and uses a brayer to really stick things together.

My brayer has been sitting in a drawer, rarely used, but after the workshop, I got it out.  I also put an old magazine on my craft desk and started using these tools: a clean page for using when I put glue on a piece of paper, and the brayer to roll over the card and get it really fastened together.

After the workshop, I spent time on the little collage Valentine’s I was crafting. I’m sure I will use Anna’s style again on other cards, but these were the busy, multi-layered cards I’d been working on with bits taken from envelopes (the lining, stamps and postmarks), maps, old dictionary and textbooks, packaging, magazine pages, vellum, tissue paper, washi tape, vintage sheet music, calendars, newspapers, business cards, and other beautiful paper.

IMG_0116-001

Mini card fronts that I layered onto small place-cards and added embellishments and rubber stamped images.

IMG_0122-001

Little tags stamped on a paint chip.

IMG_0123-001

More tags stamped on vellum, an envelope liner, an old math textbook page and more.

IMG_0126-001

Little tags cut out, hole-punched and tied with pink string.

IMG_0007

IMG_0005IMG_0003

Embellished cards.

IMG_0098-001IMG_0099-001

Two of the larger cards. It makes me happy to spend time crafting and I love when I put together a card and know exactly who it’s for.

I know Valentine’s day has passed but I just didn’t get it together to post these pictures sooner.  I wanted to share them with you and, as always, I appreciate you taking the time to stop and look at what I’ve put up.  Thank you.

IMG_0028

5 Comments

Filed under Crafts

Art from the Heart 2015

IMG_0018

Rem and I exchanged handcrafted Valentine projects with each other.

Last year we did it a little differently and instead of each of us working on an item for the other, we created something together:

IMG_0102-002

I had an idea for a message for my project this year but hadn’t figured out a medium or design. Rem wanted to think about the whole thing and after doing a little research (at Michael’s) he agreed to another swap.  I am glad because I really love the items he’s made for me over the years and the little gallery of Art from the Heart we have on either side of our bed.

We worked on them independently and save the finished projects for Valentine’s Day. This might mean I hastily grab some paper to cover my project when Rem comes out of the bedroom or I might find glue out on the dresser after work.

My heart for him this year has a number on it.  I cut each tag out of aluminum flashing and used metal stamps to stamp the number on each tag.  I used ink to enhance the numbers.

IMG_0066-001

The rest I just wanted to look kind of mechanical and the antithesis of a lacy, flowery, sweet Valentine.

IMG_0070-001

It doesn’t actually turn or move (except the little tags with the numbers, which will swing on their pins if you tip the heart), but it looks kind of like it could do something.

I picked up different gears and wheels at Michael’s and also used a small roll with a gear on one end from a tape runner, covered in copper foil tape from the hardware store. A larger roll held ribbon before I covered it in aluminum foil tape. A few brads and buttons were from my craft supplies and I picked up a piece of aluminum flashing and a small brass knob at the hardware store.  That visit included a fun conversation with a salesman (I need to take the finished project back in to show him how it turned out).

IMG_0064-001

There is a small heart, which I punched from corrugated cardboard and covered with aluminum foil tape with wings that I also found at Micheal’s. A piece of foam core backed the aluminum flashing and I used gold embossing powder around the edge.

The number represents this:

IMG_0071-001

Rem told me he found two hearts, the larger one made of wood and the smaller one of foam.

IMG_0015

He wanted to cover them with something red.  He asked for help finding the red stones, which when he saw them, he said thought they were perfect. He got a bag with several shades of red, some translucent, some not.  I love the rich color.

IMG_0021

He looked for something smaller to put in the center to cover the smaller heart and found red beads.  He said he considered covering the base with aluminum foil before gluing on the glass stones, but decided he didn’t like how it looked.

IMG_0014

It is very sweet having someone craft something just for you and this shiny red-covered heart looks luscious, kind of like a cherry pie filling.

Thank you for you stopping by.

IMG_0069-001

4 Comments

Filed under Crafts

Sometimes I Do

IMG_0025

Sometimes I get my  10,000 steps in a day. Sometimes I don’t.  Sometimes I eat Girl Scout Thin Mint cookies and read People magazine.  That’s just how it is.  Just wanted to be clear that I don’t always manage to get my steps in every day.

Last Thursday I had oral surgery.  The first 24 hours after the procedure I was using ice packs and sleeping quite bit. I took it easy for most of the weekend, napping and crafting.  I found my energy was fairly low.  Now I’m struggling to get back into my fitness routines.

I took a walk today.  Maybe I’ll manage one tomorrow.

Thank you for stopping by.


1 Comment

Filed under Life

Reward – First Bloom

IMG_0100-001

Just a day after the last post, the first little bud blossomed into this sweet mini-daffodil.  More green tips are pushing through the dirt and I expect another bud to bloom any day.

I tried to blur out some of the ugly background (chain link fence, etc.) because when I look at the flower, that’s all I see.  It is difficult to find an angle that doesn’t show the fence.

Thanks for stopping by.

Leave a comment

Filed under Life

Anticipation

IMG_0278

We planted two planter boxes with a mix of spring bulbs.  I read an article about planting bulbs in containers in layers, based on when they bloom.  We planted pretty late (early January) but the bulbs have sprouted and now some have buds.

IMG_0095-001

It’s fun waiting and watching.  If all goes well, we’ll have flowers throughout spring.

We planted crocus, daffodils, tulips, and iris.

I’ll update again.

Thanks for coming by.

Leave a comment

Filed under Life

Cobalt & Magenta Valentine’s

IMG_0037-002

Who knows when inspiration will strike, but recently it was a vase of flowers that inspired the color choices for my Valentine’s this year.

I picked out a brilliant bunch of magenta anemones at the Farmer’s Market and put them into a cobalt blue glass vase.

IMG_0001-002

I’m afraid my skill with a camera is not up to the challenge of capturing this combination and making it look as rich and wonderful as what I’m seeing.   Even as the flowers started to fade, they deepened to a darker shade that was lovely.  I bought the same kind and color of flowers two weeks in a row.

IMG_0029-002

IMG_0231

Anyway, I started going through my paper and did a little shopping so I could put these two colors together.

IMG_0018-002

I added brown paper tags and hearts, vintage buttons and some sweet little heart embellishments.  Not shown are some off-white and cream-colored sheet music, textbook pages and other vintage ephemera from my stash that I used.

IMG_0022-002

Although these cards are more focused on paper, I still use rubber stamping and I pulled out my Valentine stamps.

I knew I couldn’t really capture the color of the cobalt blue glass, but I added richness to the card designs with sparkly blue glitter tape and shiny gold paper and ink.

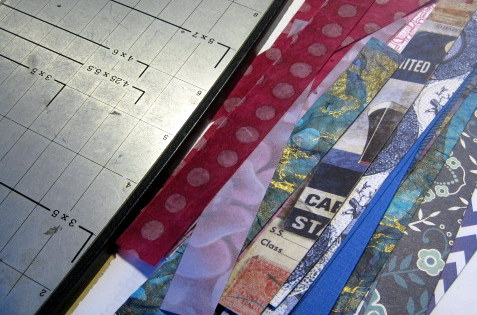
My friend Carson recently showed a technique for a “Braided Paper” background on her wonderful Pine & Plum blog, and I used that for a batch of Valentine’s.

Cut strips of paper in equal widths.

IMG_0004-002

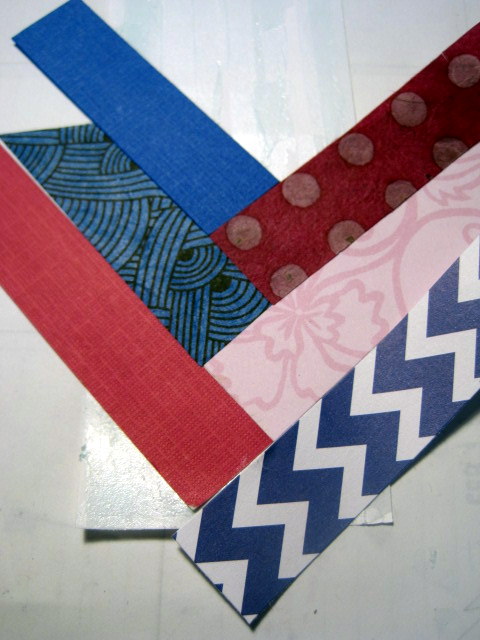
Put adhesive on a piece of paper (this will be covered by the paper strips – I used thinner copy paper rather than card stock).  I like the Tombow Mono Adhesive tape roller.

IMG_0003-002

Lay the first two strips to create a V on the paper.  The ends of the strips can go off the edge and when they’re all glued down, just turn the paper over and trim off the extra.

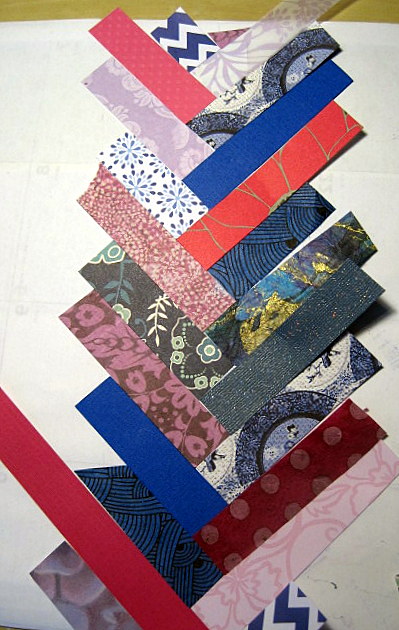
Cover the paper.  I did a long strip and cut it to size for several small cards.

IMG_0012-002

IMG_0013-002

Once all the base paper is covered and you trim the strips, you’ll have a beautiful piece of paper that looks similar to a braid.

IMG_0014-002

Here are finished cards using this technique.

IMG_0035-002

These small cards will go into little glassine envelopes I found at Paper Source and I’ll be sharing them with friends at work and in my choir.  Heart stickers and washi tape decorate the outside.

IMG_0073-001

I am making more cards, some this same small size (I used place cards) and some more standard size  and all will be using similar collage designs and the same colors and embellishments.

IMG_0075-001

IMG_0040-002

Thank you for your visit.

IMG_0031-002


3 Comments

Filed under Crafts

Just a Reminder

IMG_0042-002

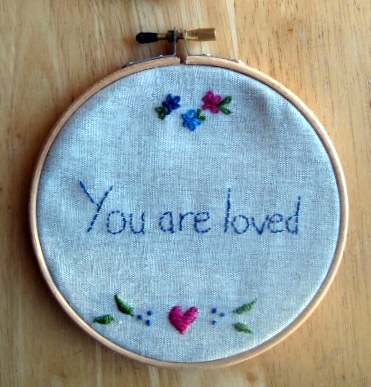
Here is a recent project from Craft Gym at Once Around in Mill Valley.

It was only last week that I realized the Craft of the Week page has directions for the crafts! So even if I miss one, I can still go to their site and get directions.  The directions are posted 1 week after they’re offered in Craft Gym.  This one took awhile to download, but others have been really fast.

IMG_0044-002

Rem is a little bemused with these two stitched decorations.  I think it reminds him of a “Home Sweet Home” needlepoint. I haven’t figured out where I’m going to hang them up, but I think it’s good to be reminded that we’re all loved.

I didn’t finish them in class.  I decided to go on YouTube to get some tips on stitches.  The satin stitch used on the heart and leaves has other stitches underneath to add some thickness to the shapes, and I used a chain stitch on the small hoop heart.  I don’t know that I want to start any large needlepoint or embroidery projects, but I found the act of pushing the threaded needle in and out of the fabric to be very soothing and relaxing.

The embroidery hoops are fairly inexpensive and I’m going to use them as the frames when I hang them up.

IMG_0043-002

Thank you for your visit.

Coming soon: cobalt and magenta Valentine’s.


Leave a comment

Filed under Crafts

Castle Card

IMG_0249

Along with making Valentine’s last week, I had a birthday card to make.  Not just any birthday card either, but a birthday card for a Princess.  What does every Princess need? A castle! So I made a castle-shaped card.

Although I saw several different castle cards on Pinterest, I didn’t find one that was fitting my mental picture, so I just sketched out what I wanted with a pencil, and starting cutting it out with scissors and an Exacto knife.

IMG_0240

This shows it unfolded all the way, which shows both the front of the card with the big medallion (sticker) on the front door, but also the birthday greeting on the inside

IMG_0244

The flip side includes a strip of vellum on the far left  (it added stability to the tall tower).  When the card is folded, the doors open to reveal “Welcome!”

IMG_0254

IMG_0239

It was fun using little scraps of paper for the turrets and rooftops, and than using different pens to add even more details.  Sparkly glitter tape is perfect for a banner on either side of the entrance.

To go with the Castle Card, I made a little garland of needle-felted wool hearts in ombre shades of blue.

IMG_0232

IMG_0251

A few years ago, this is the  card I made for this friend:
IMG_0029

Thank you for taking time to stop by.


2 Comments

Filed under Crafts