Tag Archives: create

Day 6: 30 Day Journal Project

IMG_0110

“If I create from the heart, nearly everything works; if from the head, almost nothing.” ~Marc Chagall

Loved this page! I had done finger painting on Day 4 and had a big pink heart that I pretty much knew was going to make it into the journal. I cut it into strips than into small squares. Than I covered and decorated the little inchies (slightly larger, actually), retaining the pink for the heart, keeping the white line and using other colors around the heart. I’m sorry I don’t have a photo of the original finger painting.

IMG_0106-001

I included special details, like the paper for the tiny house is from a local map, there are pieces from gift wrap, greeting cards and old calendars from friends.  Items that mean something to me are part of the piece.

IMG_0113

I didn’t finish it last night…but got it laid out and ready.

IMG_0099

I completed it during my lunch break at work (homemade green juice in the bottle = lunch).

IMG_0118

I also collected material for today, Day 7, (Next Post). But one last look at Day 6.

IMG_0112

Thank you for visiting.

#30DayJournal

2 Comments

Filed under 30DayJournal, Art Journal Pages

30 Day Journal Project for July

30 Day Journal Project badge - 500px

I’m doing this! Do you want to join me? It is 30 days of journaling, starting July 1, with artist Lisa Sonora posting daily prompts and inspiration. You can learn more about it here.  It’s also free – how cool is that?

A few years ago I signed up for a different month-long project: 30 Days of Creativity, and I did it for three years, with some variation in my participation. Here are some of my favorite creations:

IMG_0120-001

Day 6: June 6, 2013, Mosaic Poppies Art Journal Page

IMG_0099

Day 28: June 28, 2013, Collage Sand Gild Stamp Art Journal Page

IMG_0070

Day 3, June 3, 2012, Icebox Cupcakes

IMG_0074IMG_0079

Day 21: June 21, 2012, Bleach Pen T-Shirt

IMG_0009

Day 2: June 2, 2011, Embossed Tins

IMG_0084

Day 26: June 26, 2011, Fused Plastic Bags

You can look under the 30DOC tab up at the top of the blog to see all the projects I did over three years.

Last May when I couldn’t find 30DOC online, I just skipped it. I don’t know if it happened or not but I wasn’t part of it.  Of course I could have done it on my own, but there is something about doing it with lots of other people that I find compelling.

I’m excited and a little nervous to be starting this 30 Day Project, #30DayJournal, because I know it is a commitment. But I also know that when I push myself, I come up with some of my most creative work.  I purchased a new journal for the project and I cleaned off my craft desk.

Here is the before…

IMG_0030

And after.

IMG_0215

IMG_0217

IMG_0219

IMG_0221

Ready to go! Care to join me? #30DayJournal

Thanks for stopping by.


3 Comments

Filed under Crafts

Day 13: Venus at the Spa

Venus at the Spa

Day 13: Venus at the Spa.  When I go to a spa and have several luxurious treatments, I know I don’t look like Venus.  But I feel so relaxed and pampered, all massaged and buffed and polished that I come out feeling like a new me.  Like I’ve just stepped out of my shell.

I’m going to make an appointment for a relaxing visit to Imperial Day Spa next week.  It will be a lovely treat.

Dip the toe

After soaking in a jacuzzi, sweating in a steam room, and relaxing in a sauna, I will be scrubbed and massaged.

My skin will be silky smooth.  But I won’t look like this.

Venus

But I will feel like a goddess.

On Day 13 last year I was tired out and so created this Vegcycle while playing with my vegetables at the dinner table.

The year before I also created something pretty quick and easy: A Covered Match Box and Candle Set.

Thanks for your visit.

4 Comments

Filed under 30DOC, Crafts

30 Reasons to Participate

Hello, friends.  Here is a great list of 30 reasons  to participate in 30 Days of Creativity which starts tomorrow, put out by the folks at 30 Days of Creativity.  I wrote here about how I’m adapting the concept so I can do it without making myself nuts.
I encourage you to participate at least on some level.  And remember it isn’t “Create a perfect masterpiece every day for 30 days” but rather it is to “Encourage people to create stuff (anything) every day for 30 days”.  June is suggested by anytime you want is also ok.  See?  Create anything.  Toss a nice salad.  Doodle on your To Do list. Put together an interesting outfit.
Encourage is a great word.  Give support, confidence, or hope to someone.

Garner a sense of accomplishment.
Form a(good) habit.
Conquer the fear of the unknown.
Find new friends.
Solve problems.
Refine your skillz.
Experiment with something new.
Defeat
the resistance that’s in your head.
Save
$ by being creative.
Build
your portfolio.
Motivate
friends and family to be creative too.
Exercise
the creativity we’re all born with.
Overcome
writer’s block.
Utilize
the drafting table, DLSR Camera, Guitar you bought years ago.
Break
the monotony of not doing anything creative.
Make
your mom proud.
Network
with other like-minded people.
Challenge
yourself daily.
Show off
and be proud of your creative work.
Join
a creative community.
Do
something free of judgment.
Move
beyond your comfort zone
Inspire
others.
Get
excited about new things.
Improve
time management.
Eliminate
procrastination.
Have
fun.
Gain
self discipline.
Use
this as an excuse to buy a new (camera/screen printer/piano/etc).
Create
stuff you’ve been wanting to do anyway.

I’m packing a bag of craft supplies because Rem and I are going down the coast for a few days to celebrate his birthday and I’m bringing crafting along. We are going to stay in a hostel at a light house, visit Half Moon Bay and see the elephant seals at Año Nuevo State Park.

Thanks for stopping by.

4 Comments

Filed under 30DOC

Art Journal

Cover Page Artist's Journal

This is my Art Journal.  I started it after seeing some of a friend’s altered books and finally having it strike a chord in me.  I’d read about altered books and art or artist’s journals but seeing and holding one in my hands made the difference.  (Thanks, Michelle).

You can click on any of the pictures and get a larger view.

An art journal doesn’t have to be in an altered book and an altered book can be many things other than an art journal.  But for me, the two came together and I was inspired and excited to get started.

Some months ago, Rem and I were out for a Sunday drive and found a little antique and collectibles shop and I discovered this book.

Cover

If that isn’t beautiful enough, how about the title?

Wild Life

I couldn’t find a copyright date, but the inside cover has an inscription “Christmas – 1913  To Dad from Jack”  I’d found my book. I just found a copy online that has a copyright of 1881.

The book was falling apart but I was going to give it new life as my Artist’s Journal.

Inside Cover Spread

I wanted to keep the inscription so I covered over the words with a piece of tape and painted around them, creating a two-page spread of banners and blue sky.

Here is a definition that I like for Art Journal that I found online:

An art journal is a journal or diary that has a strong visual element to it, an expression of your artistic creativity and imagination, not filled only with words like a traditional journal. It’s a journal for using your art to express your memories, dreams, and thoughts. How you create the images, and what type of imagery you make, is entirely a matter of personal choice. There are no rules. You can paint or draw, use pen and ink, photos, collage, doodle, stickers… anything and everything.

That is from about.com guide,  Marion Boddy-Evans, an artist and writer.

Back to my old book.  It was written by Gustavus Hines, a missionary, about mission work around the world but mostly in Oregon.

I redid the title page.  I kept some of the original wording (I love “the fearless explorer of the Northern Pacific Coast”).

Fearless Explorer

I skimmed through the book – lots of this kind of stuff:

This part the author flatters himself will supply the Christian public with a needful desideratum with respect to the true character of that important Mission and of the courageous and self denying men who were the first to carry the Gospel across the Rocky Mountains and to proclaim it along the shores of the Pacific Ocean.

I tore pages out to make it thinner because I will be gluing other layers in. For every two-page spread, I glued several pages together to make them stronger.

Illustrated Page Spread

As I started working on my own art journal, I looked online at other art journals of which there are many.  Here is a quote from Corey Marie Parkhill.  She is an artist and blogger and she not only does her own beautiful art journal pages but she crafts and sells art journals.

Journal = Journey

A shopping trip to BLICK Art Materials in Berkeley resulted in these hearts, punched out from the shopping bag.

Brown Paper Hearts

Brown paper hearts with dictionary washi tape reinforcing the pages.

Close Up Hearts

Driving to work on a wet November morning, the stormy sky, dark with low clouds, was a perfect backdrop to a row of trees, brilliant in their fall foliage.

Simply Trust

I remembered a song we sing in choir and used the lyrics The blue paper background was perfect to recreate what I’d seen in the morning.

The leaf was stamped onto a page torn from the book, inked and embossed in layers, cut out, and inserted into the book.

Leaf

This next spread has a technique I probably first learned in nursery school.  Paint dripped on paper, folded in half and then unfolded to create a design.

I covered the pages in white gesso and let it dry before dripping and smooshing paint between the pages.  It looked like a butterfly, especially once I added the black detail.

Butterfly Flutterby

Songs weave together words and music.  That was what I wanted to do for this page: woven words & music.

Woven Words & Music

I used strips of paper woven with bands of music-printed washi tape.

Title Words & Music

I have another ongoing book, similar to an art journal that I’ve kept for years.  It is my Image Journal.  For that I have and continue to collect pages torn from magazines, along with postcards, old calendars and greeting card that I use to put together themed pages.

From my Image Journal collection I found this beautiful centerpiece from a Real Simple magazine article.  It was just what I wanted for Thanksgiving.  The background has been covered in gesso and stamped with a blessing.

Thanksgiving

An early morning walk inspired these pages.

Spiderweb with Dots

Foggy Morning

Coming from the parking garage on campus one morning, I saw a beautiful gingko tree and the bench and ground underneath thick with yellow leaves.

Bench Covered with Leaves

It rained the next day and the wind and rain stripped all the leaves off the branches and made all the leaves on the ground into a dark, sodden pulp.

The leaf is made of yellow paper.

Gingko Leaf (of paper)

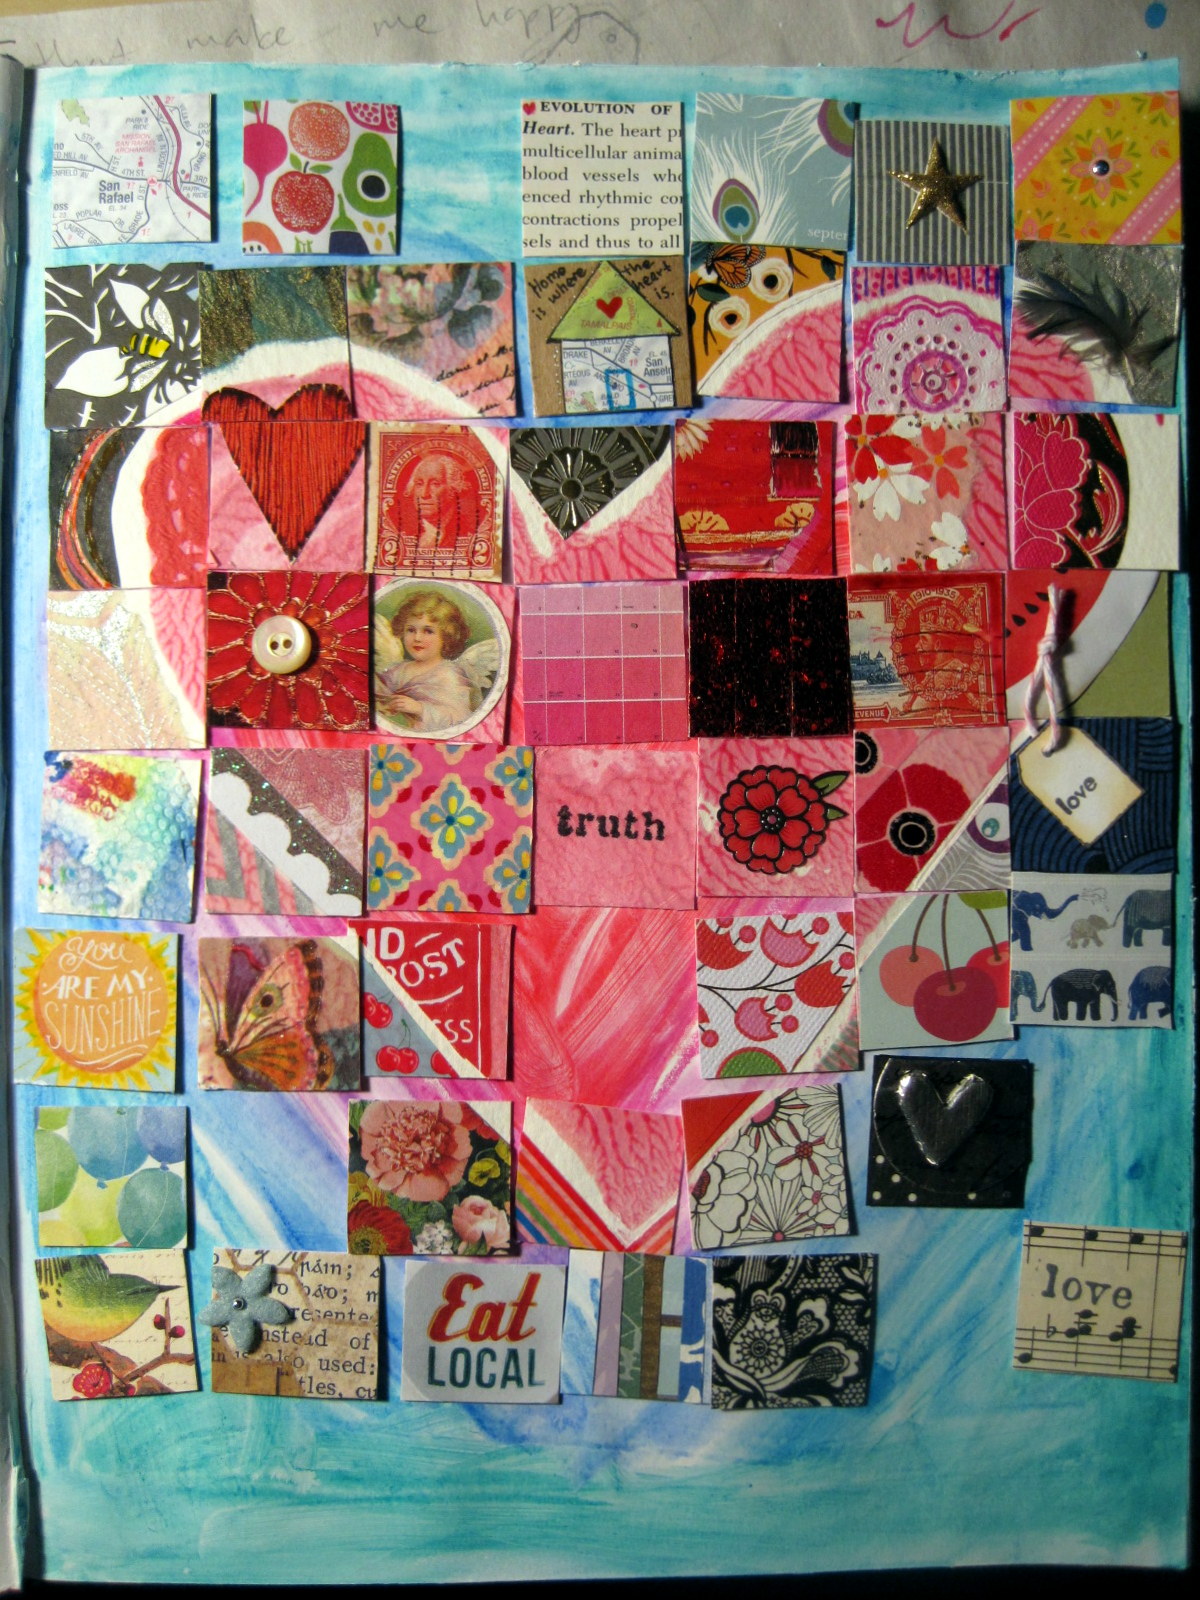
This patchwork quilt is made from 30 small squares of paper, each one with the same curve sketched into it.  After coloring a design on each square, I put them together to form circles.

Patchwork

The patchwork pages were made in December before the holidays.

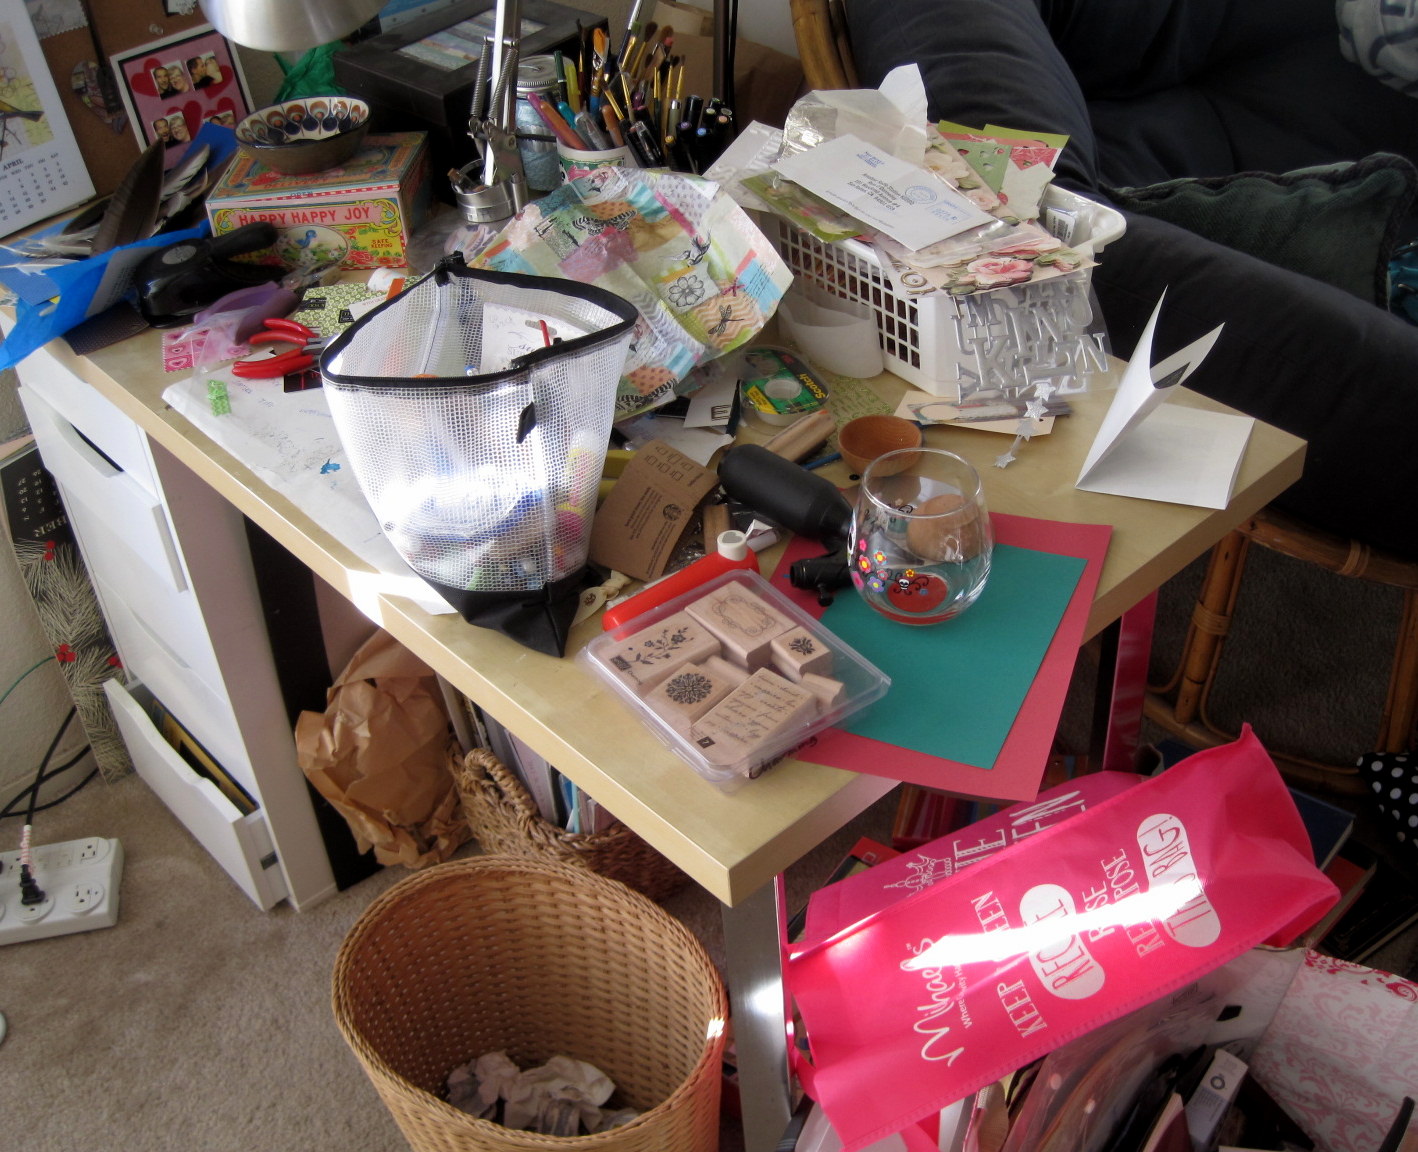
We were moving to a new office at work, I got sick with a bad cold that wouldn’t go away and my journal sat untouched for months.  I packed it in with other craft supplies for our trip up the coast to Sea Ranch and made some new entries.

Sea Ranch

Sea Ranch. Ahhhhh.

In which we celebrate

This isn’t really the view out the window because I don’t have the artistic skills to paint what I’m seeing.  But it captures the flavor of the view for me – and really one of the things I love about Sea Ranch.  Water and sky.

Water and Sky

The following page has an Anne Lamott quote, which my mom shared with me recently..  It is so obvious but somehow easy to forget.

When I got to Sea Ranch I had a twitch in one eyelid.  All I really wanted was to have no schedule, no decisions and no worries.

Anne Lamott quote

That’s pretty much how our time was spent.  Feel like taking a nap? Great, here’s a window seat and a slew of pillows.  After 6 days of salt air, visiting the lambs, working on a giant jigsaw puzzle and taking plenty of naps, I felt much more serene than when I arrived.

This is my birthday page.  Pisces girl.

Birthday spread

Not Born All at Once

Good quote for a birthday.

Edge of Waves

I did a green ferny page inspired by a green Valentine I made.

Green Fern Page

This lovely little poem by Stephen Sandy is clipped out of the New Yorker.

Alchemy

More about what an art journal can be.

Art Journal as Tool

Closed Door

I started this...

A scrap of road map and washi tape with the definition of journey.

Journey

As I continue my journey/journal I will post pictures to share with you.

My Artist Journal

Thanks for being on the journey with me.

19 Comments

Filed under Crafts

Beaded Braid Bracelet

I’ve gotten hooked on crafting different bracelets this summer and these Beaded Braid ones are my current favorites.  I first saw them on Pinterest and followed the link back to Honestly WTF, the home of this and many other great bracelet tutorials.

I think these are even easier than the macrame bracelets I made during 30DoC.  At least once you get going…

My local bead store only carried a few colors  of Irish waxed linen for this project, and now, sadly, I see they’re consolidating with their store in Berkeley and closing the local shop.  I finally stopped procrastinating about ordering online and followed the link on Honestly WTF to Ornamentea.  What yummy colors: Emerald, Turquoise, Cobalt, Lavender, Garnet and Pomegranate.

I understand about wanting to start crafting something right away.  Go ahead and purchase supplies locally if you can.  But think about looking online and placing a little supply order for some waxed linen and beads so you can make more, beautiful bracelets.  The supplies will arrive before you know it and you can start braiding these sweet, little bracelets.

The closure is a button so you don’t even need any special findings or tools.  Just the waxed Irish linen, the beads, a button and if you want, a little charm.

I think the clever and creative ladies at Honestly WTF must be especially dexterous.  I’m good with my hands and I’ve made a lot of things but I can’t manage to do some of these macrame and braided bracelets unless I tape them down or pin them to something.  I always feel like I just don’t have enough fingers!

By the way – I made most of the bracelets using 8/0 seed beads but in several of the photos, including the one above, I used flat spacer beads made out of nickel which you can also find here at Ornamentea.

When I first tried making this bracelet it didn’t look anything like their photos.  I kept undoing it and starting over.  So I  read through the directions carefully and made another attempt and it finally worked! I’m hoping my directions and pictures will help you do it right the first time.

Here’s how you can make your own Beaded Braid Bracelet.

Beaded Braid Bracelet

Supplies:

1.5 yards Irish Waxed Linen (4 ply, aprox. 1mm in diameter)

55 to 70 8/0 size Seed Beads

1 2-hole Button (aprox. 1/2 inch, or between 10 and 13 mm)

1 Small Charm (optional)

Scissors

Tape (optional but highly recommended) to tape your bracelet to your work surface – I found it difficult to hold it while I tried to add beads, keep the braid tight and keep the bracelet from twisting.  Washi tape is just the thing for keeping the bracelet in place while you work. Masking tape or painters tape would also work.

The 1.5 yards of cord is a little more than you’ll need but it is easier to work with and have a little to trim off  than to skimp and be just a bit short.

Directions:

Cut the Irish waxed linen cord into two pieces: one of 26 inches and one of about 18 inches.

Fold the longer piece in half, lining  up the two ends evenly.  Take the shorter piece and line one end up with the other two and curve the other end around the fold of the longer piece forming the loop which is one end of your bracelet.

In the picture below you can see the longer piece folded in half.  The shorter piece has one end lined up with the two ends of the long cord and the short end bending around the fold of the long cord.

Hold the two cords together at the bended end, forming a two-strand loop.

Tie a knot about 1/2 to 3/4 of an inch from the loop. In the picture below, I’ve tried to mark where you first tie a knot… (follow the PINK tape) than you trim the short tail off, just below the knot (follow the neon green tape).

Which leaves you with with a double loop of cord, a knot and three strands ready for braiding.

(Side note on braiding.  I assumed you would know how to braid.  If you’d like directions on braiding three strands, you can go here.  You just keep repeating the steps until you have the length of braid you want, which in this case is about1/2 inch as follows.)

Already know how to braid?  Continue here: Braid the three strands tightly together for about 1/2 inch. At this point I find it easiest to tape it to my work surface to I can keep the braid fairly straight and even.

Now you will start adding beads to each strand as you cross them over.  Start with the left side and put a bead on the cord.

The trick with this bracelet is pushing the bead all the way to the base of the braid and when you cross the cord to the center of the braid, the bead should be behind the x made with those two pieces of cord.

In the picture, above, I put my first bead on the left side.  It isn’t pushed all the way down here.  In the next picture I’ve pushed it down to the base and crossed the left cord over the center cord.

You can see the two cords make a little X with the cord that is now on the left pushing back on the bead.  The next bead is added on the right and that cord will than cross to the center.

Again, the bead is pushed tightly to the base of the braid and the cord is crossed to the center with the cord now on the far right pushing the bead back and the two cords forming the X in front of the bead.

Continue adding a bead before each time you cross the cord to the center.  Push the bead down than cross the cord to the center, keeping the bead behind the X of the cords and keeping the braid tight.  The wax on the cord helps keep the braid snug and the beads in place.

This next step is optional – I am not sure it really saved me time, and I don’t think saving time is really my goal when I’m crafting.  But you can try it if you like: once you have the rhythm of adding a bead and crossing the cord over you can add several beads to each strand, pushing them tightly down one at a time as before.

Other people have told me they enjoy doing it this way.  I found I would get lost trying to figure out which strand I was on.  So again, this is an optional step.

Either way, continue beading until you’ve reached your desired length, keeping in mind that after the beaded section you’ll still have another half inch or so of braided cord and the button. I don’t want a tight bracelet so I measure my wrist and add about 1 inch to that length to get my finished size..  You can un-tape your bracelet from your work surface and measure on your own wrist or, once you’ve got one completed that is the right size, measure against that one.

Finish the bracelet with a half inch of plain braid (without beads) like at the beginning.  Add a charm if you want.

Braid a bit more after the charm so it doesn’t get lost under the button.  Tie the three strands in a knot and slide on the button – 1 cord through 1 hole and two cords through the other hole.

Tie a knot on the other side of the button.  Pull the strands apart to tighten the knot.

Trim the ends and you’re done!

Make some more.  Stack them together or wear them with other bracelets.  Like these.

The bracelet with spacer beads is made the same but the spacer beads are narrower than the 8/0 gauge ones so it takes a few more beads to make a bracelet.

Thanks for the visit.  Let me know if you make one of these fun bracelets!

UPDATE: Check out my Readers’ Gallery to see pictures of some great bracelets made by readers’ of my blog.

82 Comments

Filed under Crafts

Scorecard for 30DoC

I’ve been thinking about all those things I created during the 30 Days of Creativity (30DoC) project, and I decided to review and rate them in several areas:

Was it fun to make?  Did I like the results?  Would I suggest it to others? Would I do it again? Do I consider it a winner?

I’m using a scale of 1 to 10 with 1= No Way! and 10= Definitely!

Project

Fun?

Like?

Suggest to

Others?

Repeat?

Winner?

Day 1: Washi Tape B-day Card

8

9

8

8

8

Day 2: DIY Cake Stand

7

10

10

5

8

Day 3: Icebox Cupcakes

6

9

10

6

8

Day 4: Double Sponged Card

10

10

10

10

10

Day 5: Tape Dispenser

6

10

8

4

7

Day 6: Shrinky Dink Rings – Fail

5

0

0

0

1

Day 7: Lemon Ice Cream

7

10

10

10

9

Day 8: Cardamom Cookies

5

6

7

7

6

Day 9: Glass Tile Pendants

9

9

10

10

9

Day 10: Veg Potato Salad

5

8

8

8

7

Day 11: Button Rings

9

8

10

7

8

Day 12: String Jar

7

10

10

5

8

Day 13: Vegcycle

10

10

4

0

6

Day 14: Business Cards

10

10

10

10

10

Day 15: Lined Envelopes

7

9

10

6

8

Day 16: Carved Rubber Stamp

10

7

7

10

8

Day 17: Chocolate Bowl

8

0

0

0

2

Day 18: Banana Message

10

8

10

7

9

Day 19: Wrap Bracelet

9

10

10

10

10

Day 20: Chewy Granola Bars

8

10

10

8

9

Day 21: Bleach Pen T-Shirt

9

10

10

10

10

Day 22: Water Marbled Nails

6

4

5

0

4

Day 23: Crepe Paper Flower

6

8

8

9

8

Day 24: Lace Pancakes

8

10

10

10

10

Day 25: DIY Blue Glass Jars

7

9

9

5

7

Day 26: Recycled Gift Bow

6

9

10

5

7

Day 27: Image Journal

10

10

10

10

10

Day 28: Marbleized Notebook

5

8

10

3

6

Day 29: Plastic Spoon Rose

5

6

7

0

4

Day 30: Macramé Bracelet

8

10

10

10

10

Some projects didn’t really work in the end, but were fun to make.  I have to say the Chocolate Bowl project that ended up splattering melted chocolate all over me was fun.

Would I suggest it to someone else? No.   The final score isn’t always mathematically correct.  I rounded up for some and rounded down for others just depending on my own gut response.

I have a total of 7 projects that I gave the full score of 10 in the Winner Category.  Does that mean they’ll work for you or that you’ll love them?  Nope.  But those are the projects I will go back and do again, in fact, I’ve already completed another wrap bracelet and I did a batch of Sponged and Embossed Cards.  I want to make another batch of business cards because I so enjoyed making them and because I want to have business cards with my blog site on hand to give away.

The recipe for the Lacy Buttermilk pancakes made delicious pancakes even in a traditional but boring round shape.  I’ve made another batch of those but I loved the lace ones too and I’m sure I’ll make them again.

I don’t know how soon I’ll do a Bleach Pen T-Shirt but I’m completely delighted with the one I made and I am happy to put it on every time I wear it.

I’ve had my Image Journal for years but it had been gathering dust lately.  It was such a pleasure working on a layout that I plan to continue doing pages.

My final project, Macrame Bracelets, has been keeping me busy in recent days.  Some friends at work wanted a closer look so I  organized a crafting session at lunch.   I love it when I can combine crafting, eating, talking and laughing with friends!  I’ve made a few more macrame bracelets and I keep going back to the bead store for more supplies so I’m not finished with this project yet.

What were your favorite projects?  Are there any you’ve tried or plan to try?

Thanks for the visit.

10 Comments

Filed under 30DOC, Cooking, Crafts

Day 21: Bleach Pen T-Shirt

As usual with these projects, there is a certain amount of learning curve.  I’m trying a whole bunch of different things that I’ve never done before.  On the one hand, I’m pretty creative and crafty and I’ve worked with different materials so I have an idea of how something will work (or not), on the other hand, when you are doing a different project every day for 30 days, it’s easy to become overwhelmed!

This is a t-shirt that has the lyrics of a favorite song written on it with a bleach pen.  I first wrote it out in chalk.  I was inspired by this. I actually did this whole project this morning before work.  The only problem is I was using an old bleach pen and I didn’t realize the bleach had evaporated.  It had a fairly mild smell and I should have realized it wasn’t bleachy enough. So after getting the whole thing written in chalk and written over in bleach pen it didn’t work.  I got a new pen after Jazzercise and started over.

I loved the way it came out the second time around anyway, so I guess it’s just as well I decided to redo it.

I lay some plastic shopping bags into the shirt so the bleach wouldn’t go through to the back of your shirt.  Smooth out the wrinkles as best you can.

I wrote out the lyrics of one of my favorite songs on the shirt using chalk.   It was recently sung at my father’s memorial service by the Threshold Choir.

To Dream Again

By Wendy DeMos

I bow to your magic.

I fall into your grace.

I move toward a prayer.

Your fields and rivers waiting.

For the dawn the shadows breaking.

To dream again.

To dream again.

To dream.

As lovely as the lyrics are, it is the music that is so incredible.

There are pictures online of other wonderful bleach pen projects but I wanted to try this song.  I might do a peacock feather next.  I can imagine a mendhi-like design being particularly effective.  (Mendhi is the temporary skin decoration made of henna and often seen in elaborate designs on hands and feet of brides in India).

I wrote on my cotton t-shirt with chalk.  I read that the bleach from a bleach pen can spread and the chalk helps to slow the spread.

I didn’t have that issue (I’m using a gel bleach pen) but wanted to write it out first before jumping in with the bleach.  The chalk is actually a little harder to write with than the bleach pen, but it was helpful to follow once I started with the bleach pen. I also wrote out the song on paper because I’ve found when you are working slowly on a craft project  and in this case focused on getting the chalk to write on the fabric, it is helpful to have something to look at to help stay on track.

You might consider using either an old t-shirt or picking one up from a thrift store (maybe one that already has a spot or two of bleach?) because this does have the potential for wrecking a shirt.

I kept some paper towel on hand to wipe the tip of the bleach pen.  Sometimes I would get bubbles but I just kept going.

Open a window for ventilation and shake the bleach pen well.  If it doesn’t smell very bleachy, you may find, as I did, that the active ingredient has evaporated.  I got a new pen and it was fine.

Start at the top and use a steady hand.  I tried to keep writing if I was on a roll than go back and add connecting lines, dots on the i’s, etc.  Wipe the tip of the pen with your paper towel every once in awhile.

Different fabric and dye will respond differently to the bleach pen.  I was concerned about damaging the shirt but actually found it was not as bleached -out as I expected.  The bleach gel medium is a little tricky because it looks very white and bleached-out on the shirt but when you run it under cold water you learn it is just the dried or drying gel  that is so white and the words underneath aren’t that light.

After running cold water on the shirt, rinse out all the bleach, than wash.  I used gentle liquid soap that I usually use for lingerie.  I wanted to see the results so after rolling it in a towel, I used a hot iron to press (and dry) my shirt.  I actually went back and wrote over some of the words near the bottom that hadn’t had the bleach on as long as the words at the top. I let the bleach sit for about 5 minutes than rinsed it out, washed it again, wrung it, rolled it in a towel and finally ironed it dry.  The hot iron seems to enhance the bleaching effect.  You could also  throw it in the wash once you’ve rinsed out the bleach.

I’m delighted with the results.  I just wish I’d achieved them earlier this morning before work.

Last year I created Cards with Charm on Day 21.

Thank you for checking out my latest creation.  Nine days left in the 30 Days of Creativity project!

13 Comments

Filed under 30DOC, Crafts

30DoC Status Update + Magic Shell Chocolate Sauce

It’s the 15th of June, the halfway mark for 30 Days of Creativity.  It is going very well for me.  Having plans for possible projects has made a huge difference.  I started copying down ideas along with websites and supplies or ingredients needed several months ago.  A few weeks before the start of June I put them all in a chart.

When the 30DoC calendar was posted I was able to look at my chart of ideas and pick out ones that could work with the themes, although that wasn’t a big concern for me.  The themes are fun and sometimes help direct me towards an idea but I don’t focus on them most of the time.

I’m happy to see that I’ve still been flexible and open to other ideas so I’m not completely tied to my chart.  I’ve created three things that were not on the original list (and we’ve still got 15 days left).  What I’m noticing is that even with plenty of projects to choose from, more than enough to get through the month, I’m more affected by the weather than I thought I would be.

I’ve got a Chewy Granola Bar on my list but when I’ve had time to make it, it’s been too warm out to turn on the oven.  Even a project that won’t heat up the apartment but is more tuned to cold weather (a Felt Flower Scarf) isn’t very appealing when it’s 90 degrees outside.  Not that I won’t ever make these things, but they just may not debut as a creation during 30DoC!

Two nights ago I made Magic Shell Chocolate Sauce.  I started to write a post and put some pictures together but I was really, really exhausted.  It was the day after my dad’s Memorial Service and though it went beautifully, it was emotionally draining.  So here is the sauce.  It isn’t a fail but nor is it a big success.  Kind of a “meh”.  Luckily, Rem and I put together the vegcycle that evening so I still had a creation to post!

Attempt: Magic Shell Chocolate Sauce 

Maybe because I was tired and cranky, but chocolate usually makes me happy and this was disappointing.  I saw the recipe here on Whipperberry.  Heather on Whipperberry was adapting a recipe from foodnetwork.com.  Maybe if I used the tip from Aarti Sequeira on Food Network and did it with something besides chocolate chips (she specifically says not to use chocolate chip), I’d like it more.  On the other hand, Heather said she used chocolate chips without any problem.

I tried the sauce the next evening and was still underwhelmed.  It is fairly thick and gloppy.  Not very magic.  It’s still chocolate so it can’t be all bad!

It takes just two ingredients:

2 Tablespoons Coconut Oil

8 oz.  Dark Chocolate chopped up in small pieces –  I used chocolate chips

Heather suggests you use a double boiler for melting, but I used a microwave. In a microwave-safe container, melt the coconut oil.  Stir in the chocolate chips and heat in short bursts of 15 to 20 seconds at a time, on 50% power, stirring chocolate sauce after each heating time.

When the sauce is cool, drizzle on your ice cream and watch it harden.  Rah.  Magic.

Ta da!

The flavor of the coconut is apparent in the sauce which for me was fine.  It reminded me of a Mounds Bar.  But keep this in mind if you are serving to a coconut-hater.

I’m glad to be doing the 30DoC again this year.  It does take time and energy but that is really a plus for me in these days after the death of my dad in late May.  Grief ebbs and flows but the crafts give me focus and I’m very comfortable sitting at my craft desk making something.  Creativity also seems to attract more creativity so I’ve been cooking and making things that I don’t blog about.  It is wonderful therapy for me.

Now, I’d best go create something for today, Day 15!

Thanks for sticking with this and with me through the 30DoC.

3 Comments

Filed under 30DOC, Cooking, Crafts, Life

Day 1.1: (Addendum) CREATE at the Beach

It wasn’t really my project for 30DoC but I wanted to share it.  Thank you to Rem for taking these photos.

2 Comments

Filed under 30DOC